

Part of what made Syracuse China such a well-known brand and renowned product was the company’s detailed process and quality control. Below is an outline of how the company created a piece from start to finish:
Shape Design: Before a piece of china was made, a staff of designers, modeler, and pattern artists created models and studies for the shape of the china and its applied decorations. A new piece sometimes required as much as a year of preparation. After the preliminary drawings, each piece had to be approved before the creation of a full-scale model for each item. Once approved, the models would be sent to the mould shop.
Mould Shop: Moulds were used to produce ware of uniform dimensions. They were made from plaster of Paris because it absorbed moisture from the clay, diminishing its plasticity and enabling the unfired greenware to keep its shape. Moulds were made larger than the finished piece of china, to allow for the 10 to 15 percent shrinkage that occurred during drying and firing of ware.

Clay Preparation: The essential component of the ware was a high-quality clay. Clay’s main ingredient, hydrous silicate of alumina, becomes plastic when wet, making it possible to form the ware. The clay body’s two other components were inerts, such as flint, to hold the formed body together and give it strength, and fluxes, such as feldspar or whiting, that melt in firing to fuse the clay and inerts together. Clay formulas were highly guarded trade secrets.
Forming the Ware: The working moulds were sent to the Clay Shop for use in making ware. The process of pressing the plastic clay body into the moulds was a complex multi-step process that was different for each shape of ware produced. Beginning late in the 19th century, the process of forming the ware went from a strictly hand operation to a mass-production assembly line process that increasingly depended on mechanization. Nonetheless, the process always required certain hand steps. After the “greenware” had been in the mould long enough to dry, it was separated from the mould and then “finished” by smoothing out seams with fine sponges.
Kilns: Once a piece of “greenware” had dried sufficiently, it was ready for its first firing in the kiln. The first firing at 2,250 degrees Fahrenheit, called biscuit firing, hardened the ware. After coating with liquid glaze, it was returned to another, glost (glaze) kiln. This second firing at a lower temperature of 2,050 degrees Fahrenheit, gave the ware its protective surface of glass-like hardness. Sometimes the ware received a third firing at 1,450 degrees Fahrenheit to fuse certain decorations. A typical cycle of setting a periodic kiln, firing it, cooling it, and unloading it, took about a week.
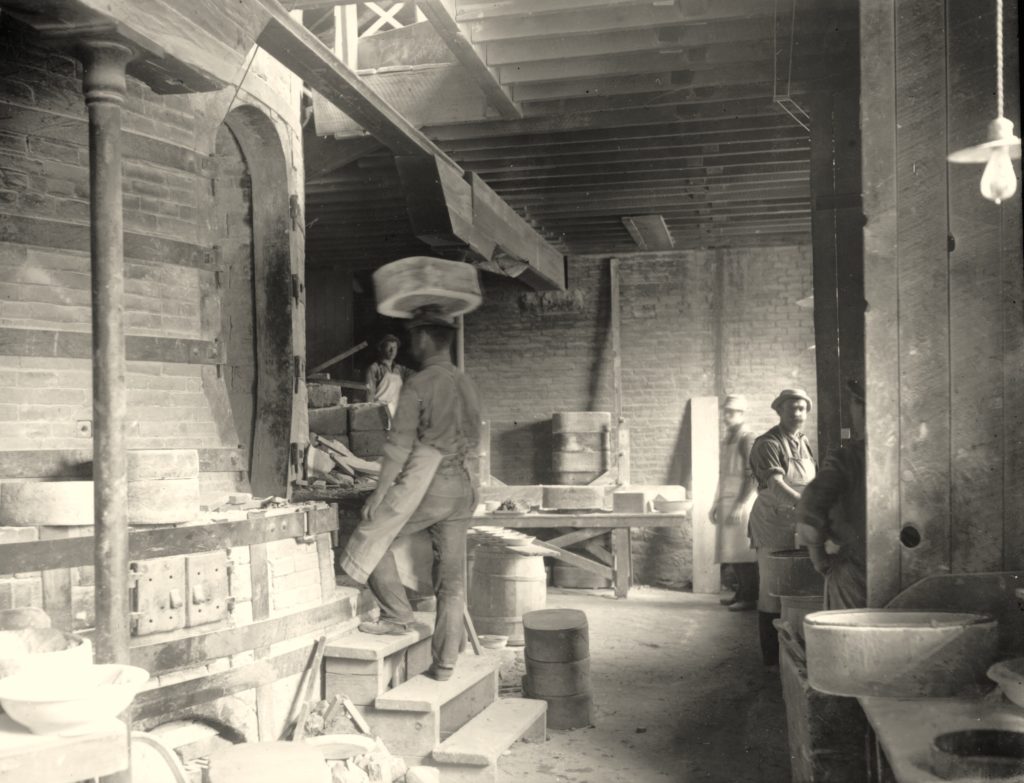
Biscuit Ware: Once cooled, the biscuit ware was sorted and faulty pieces were removed. It was then carefully placed in tumblers so that it would not be nicked or cracked while very small pebbles or a bit of broken biscuit ware were tumbled gently against the ware to act as an abrasive which gave it the smooth, satiny surface necessary for the application of underglaze decorations. When this was completed, the ware was inspected for flaws. The usable ware was back stamped with the trademark and sent to the biscuit stock room to await decoration orders. Before decorating, all ware was washed in hot water to remove dust particles.
The Color Lab: Technicians in the Color Lab prepared colors to decorate china. The color was made from three ingredients: oxides, fluxes, and pacifiers. The oxides determined what color would be produced. For instance, chromium oxide produced greens; iron oxide mixed with chromium, brown; cobalt, blue. Fluxes caused the oxides to combine and pacifiers cut the intensity of color, giving it shades.
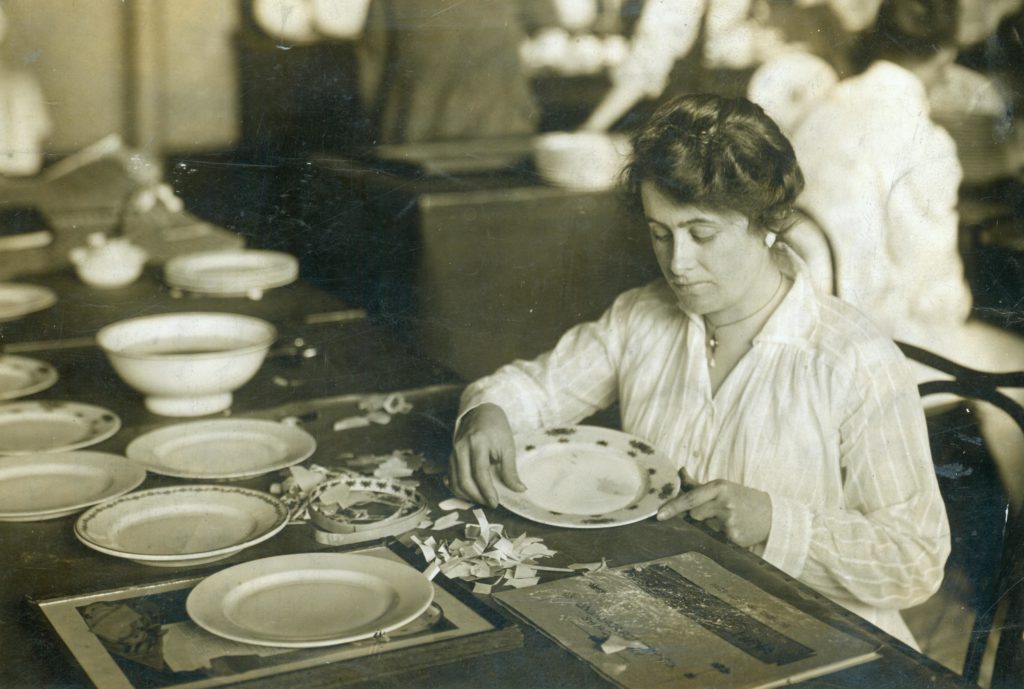
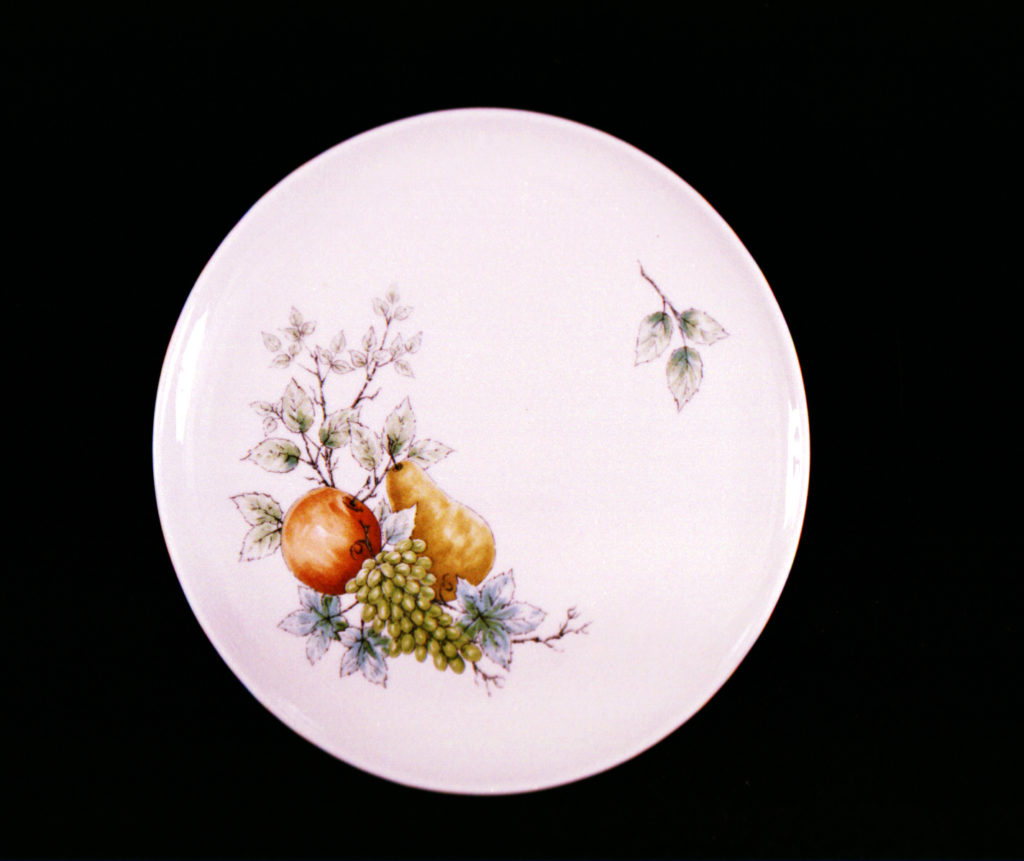
Decoration: There were two kinds of decorations; formed and applied. Formed decoration in relief or intaglio carved in the mould glost an integral part of pieces during biscuit firing. Applied decoration went on the ware’s surface after a biscuit or glost firing. Decoration of prints, decalcomania, lines, or other treatments applied to biscuit ware before it was glazed was known as underglaze; decoration applied to glost ware after it had been glazed and fired was overglaze. Lining and hand-fill were two of the oldest types of applied decoration. Lining was done on a liner’s wheel mounted on a bearing; with one hand the “liner” turned the wheel while holding the brush against the piece of ware with the other hand. This needed keen hand-eye coordination. “Liners” also did freehand work on handles or irregularly shaped ware. Hand-fill or hand-painted decoration was freehand work, sometimes guided by printed outlines that burned off during firing.
Transfer printing process was an important early type of applied overglaze decoration suitable for large quantities of ware. In this process, a prepared design was drawn and engraved on a flat copper plate. The printer first inked the plate with color, wiped the surface clean, leaving the color only in the engraved lines, and printed it on a hand press on dampened tissue paper. After printing, and before the color dried, workers transferred the design to the ware by placing the tissue (print color-side down) on a piece of ware and rubbing it gently, but firmly, with a short bristle brush to ensure that the color adhered to the ware. They then placed the ware in water, floating the tissue off but leaving the oil-based printed pigment on the ware as an exact reproduction of the copper engraving. Decorators then often hand-filled the printed outlines with ceramic pigments. Finally, the ware was fired in a decorating, or hardening-on, kiln at 1450 degrees Fahrenheit. The transfer printing process allowed the printed application of only one color. Other colors had to be applied by hand.
The arrival of the French decalcomania process in the 1890s enabled decorators to apply a multicolored overglaze decal produced lithographically. Decalcomania required the use of a limestone printing block or stone. Each color in a decal required a drawing with an oil-based ink or crayon on a separate stone. The pressman printed the stones in a lithography press in succession on a piece of transparent film bonded to a specially prepared paper with water-soluble glue. Each color needed to dry before the next was added. The result was a multiple-color image of high quality. A single printed sheet of decals held patterns for several items. In applying them, a decorator cut the appropriate design from the sheet, wet it, and applied it to a piece of ware that had been prepared to receive it. The decorator rubbed it onto the ware to ensure the proper transfer of the decal ware and then floated off the backing paper. This left the film and printed design in place and ready for firing in a hardening-on kiln. After WWII, silkscreen printing replaced stone lithography.
Under glaze decalcomania made decorations practically indestructible. Other developments in underglaze decoration included the sprayed Vitritone, Syratone, Artint, and Shadowtone processes. Vitritone involved an application of color to greenware before the biscuit firing. Syratone, a process developed at Onondaga Pottery, permitted a uniform application of sprayed color in bands on the rim or as an all-over color on biscuit ware. Artint was a sprayed band of color on the intaglio pattern of Econo-rim ware. Shadowtone was color sprayed through and around stencils, plus delicate hand-shading. Once underglaze decorations had been applied, those decorations that required hardening-on went to the hardening-on kiln, then all ware was sent to the dipping room for glazing.
Glaze: When fired onto ware, glaze gave a protective surface of glass-like hardness. The liquid glaze was poured into large wooden vats into which the ware was immersed by dipping. Successful dipping required experienced personnel who knew the properties of each glaze and how each type of ware and underglaze decoration needed to be treated. After the ware was dipped, it was ready for the next step: placing in the glost kiln.
Glost Firing: The glost kiln atmosphere had to be kept free from dust, for it could cause blemishes on the glazed surfaces. After the glost kiln had been fired and cooled, the glazed ware was carefully removed and transported from the kiln room to the glost wareroom.
Glost Ware: In the glost wareroom, the ware was sorted into types and distributed to the grinders where grinding wheels removed the marks left by the pins and utensils that had supported and held the ware in the kiln. The polisher then gave the area of the marks a lustrous polish. Next the ware was selected according to 3 classifications: Firsts went directly to the stock room, grinders were sent to those who removed surface defects with grinding and buffing wheels, seconds and thirds were sorted further to distinguish ware that could be sold at discount and ware that was unsalvageable and had to be destroyed.